Tuesday, July 23, 2013

Vintage Tin Signs


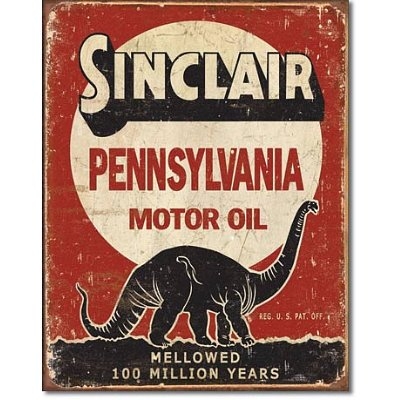
Sinclair Mellowed 100 Million Years Distressed Retro Vintage Sign
These high quality Vintage Antique Tin Signs have a distressed and retro look and feel. These vintage signs contain themes for old Beers, Diners, Colas, War, Gas Stations, Guns, Coffee, Garages, Railroads and many more. We have an awesome selection of old-fashioned metal signs with a cool, vintage look. A Vintage tin metal sign can add a unique funky decor for your Kitchen, Gameroom, Garage or Business.

Tuesday, July 10, 2012

My airblown inflatable is not fully inflating or appears “soft” once inflated.


Your airblown inflatable unit should fully inflate under most conditions.   If your airblown inflatable unit is experiencing difficulty inflating, try the following:

  1. Check to be certain that the blower motor and fan for your airblown inflatable is operating.  If the motor/fan unit is not operating, check to be certain your electrical connection is secure, and that no circuit breakers, GFCI ground fault interrupter units or fuses (as so equipped) along the line are tripped.  Repair or reset as necessary.
  2. Check your zippers – this is the number one reason for inflation issues.  Check each section of your airblown inflatable may have two or more zippers. Sometime manufacturers are really good at hiding the zippers on their airblown inflatables in the seams. If your airblown inflatable has an inflatable globe, check to see if there zippers on the globe or even on the characters inside the globe.
  3. Inspect your airblown inflatable for any tears or rips in the fabric and repair as necessary.
  4. Check that your blower motor and fans on your airblown inflatable are level and the intake vent of the fan(s) is free from obstructions like fabric or grass.
  5. Check to be certain that your blower motor is on the proper speed setting, if so equipped.
  6. Check that the air output vent (exiting the inflation fan) of your airblown inflatable is not obstructed by fabric or any other foreign object.
  7. Check to be certain that the blower motor and fan on your airblown inflatable is plugged directly into a properly sized wall outlet AND/OR that you are using a properly sized heavy duty outdoor extension cord.  If the amperage required by your airblown inflatable blower motor is higher than your outlet or extension cord can provide, your airblown inflatable will not inflate properly and will not remain properly inflated over time.


Tuesday, July 3, 2012

My airblown inflatable is not animating properly.


There are a number of reasons why your airblown inflatable may stop animating properly.  High wind conditions, heavy snow or ice are major reasons why your unit may stop animating.  Under those conditions, the unit should be powered down until conditions are once again favorable for use.  If the above conditions are not the cause of your airblown inflatable animation failure, it is likely caused by one of three situations, as follows. BE CERTAIN THAT THE POWER IS OFF TO THE UNIT BEFORE ATTEMPTING TO TROUBLESHOOT ANIMATION ISSUES.  Electrical shock may occur if you attempt to repair an animation issue while the airblown inflatable unit is under power. 
  1. Check any animation motors to be certain that they are plugged in and operating.  If an animation motor in your airblown inflatable is unplugged or a circuit breaker or fuse has been tripped, proper animation will not occur.
  2. Check to be certain that the surface that your airblown inflatable is located on is level.  Uneven or less-than-level conditions may cause the animation in your airblown inflatable to cease operating, or to operate at less than optimal speed or efficiency.
  3. Check to be certain that the rotating animation cuff does not have fabric twisted around it – this may cause tension and restrict or prevent animation. If the fabric is twisted around the cuff, carefully untwist it.


Wednesday, June 27, 2012

Can I replace a light inside my Airblown Inflatable?

YES – generally speaking the lights inside your airblown inflatable unit are replaceable.  To replace a light which may have failed, simply follow these steps:


  1. Locate the area in which the failed lamp is located.
  2. Deflate your airblown inflatable completely by unplugging the unit or switching the power switch off (if so equipped). BE CERTAIN THAT THE POWER IS OFF TO THE UNIT BEFORE ATTEMPTING TO REPLACE A FAILED LAMP.  Electrical shock may occur if you attempt to replace a failed lamp if the airblown inflatable unit is under power.
  3. Unzip the bottom zipper for one-zipper units or the zipper closest to the failed lamp on multiple zipper units.), locate the lamp needing replacement, remove the light cover (if so equipped) by squeezing it sideways and replace the lamp (and the cover).   Most of the lamps inside airblown inflatables are generally C7 lamps or mini lights and can be found at most hardware and home improvement centers.
  4. Close any open zippers.
  5. Re-inflate your Christmas or Halloween airblown inflatable using the guidelines in your owner’s manual.


Wednesday, June 6, 2012

Are airblown inflatables easy to deflate and store?


YES – they are one of the easiest forms of decoration to take down, but there are some deflation and storage guidelines that you must follow to ensure that your airblown inflatable will be ready to use again the next time.

  1. Wipe your airblown inflatable clean with a damp cloth and allow it to dry COMPLETELY before packing or storing the unit away. Use mild detergent if necessary. NEVER PACK YOUR AIRBLOWN INFLATABLE WET!!! If your airblown inflatable is stored wet or in a humid or moist environment, mildew and mold can form in a matter of days, destroying your investment and voiding any manufacturer warranties (not to mention the smell when you open it back up!).  In most cases, you should clean your airblown inflatable with a water-soluble cleaner prior to storage and allow it to dry completely before folding and/or storage.  Standard rubbing alcohol can be used to review tough dirt or stains or even mild mold or mildew which may have formed during use.
  2. Turn off the blower system by either switching off the blower or simply unplugging the blower motor if your airblown inflatable does not have a power switch.
  3. Open the deflation zippers to allow any air inside to escape.  Your airblown inflatable may take several minutes to actually “deflate”.  Remain clear of your airblown inflatable unit so that you do not inadvertently become trapped inside or underneath the unit as it deflates.  Also be careful to keep the tethers attached so that the unit is not tossed or blown by and sudden wind gusts during deflation.
  4. Remove the tethers and uncouple the motor (if your unit has an external blower motor) from your airblown inflatable.  It is generally a good idea to pack the tether cords inside the airblown Christmas inflatable to prevent loss during storage.
  5. Position your airblown inflatable so that it is flat, and then begin folding the sides toward the center until your airblown inflatable is the proper width to fit into your storage bag or container.  Roll (DO NOT FOLD) the airblown inflatable like a sleeping bag, pushing any remaining air out as you roll. If your airblown inflatable has an internal blower motor, begin rolling the unit at the blower motor system.
  6. Patch any holes left by your tether anchors as necessary.
  7. Store your airblown inflatable in a cool and dry place, away from humid or wet conditions and high heat.

Monday, June 4, 2012

How to Setup Your Inflatable


Are airblown inflatables easy to set up and use?

YES – they are one of the easiest forms of decoration to set up, and once your airblown inflatable is set up it requires little maintenance until it is time to take it down and store it for the next use.  Generally speaking, you would follow these steps (consult your airblown inflatable instructions for more details about your specific airblown inflatable):


  1. Choose a location for your airblown inflatable, being certain that the inflation site that you choose does not block walkways or pathways, impair visual lines of sight (i.e. blocking motorists view) or impair normal traffic flow (i.e. blocking a speed limit or stop sign).
  2. Find the closest electrical source, keeping in mind that the blower for your airblown inflatable requires a certain amount of rated amps to operate fully and properly.  If the location you have chosen requires multiple extension cords to reach, you may want to choose another location so that your airblown inflatable operates properly and also to prevent damage to the airblown inflatable motor.
  3. Map your anchor points, keeping in mind that you want to maintain approximately a 45° angle between the top of the tether on your airblown inflatable and the ground.  If the tethers are going to block a walkway or otherwise cause an unwanted or unwise obstruction, select another, more suitable site to locate your airblown inflatable.
  4. Unpack your airblown inflatable from the manufacturer’s packaging, being careful not to tear the surface of your airblown inflatable, and also being careful not to drop the inflator fan. Lay the deflated airblown inflatable out in an area clear of sharp objects, obstructions and any substances that could permanently stain your airblown inflatable.  Locate the inflation tube or point of your airblown inflatable and place it where the blower will be located.
  5. Locate the clips (normally metal) on the bottom of the airblown inflatable fabric and attach them to the legs.
  6. Turn your airblown inflatable unit upright, being certain that the air intake is not twisted, is clear of fabric or other obstructions and that the zipper (if so outfitted) is fully closed. An open or partially opened zipper is a common reason for your airblown inflatable to look “soft” or “un-inflated” once you are completed, or could prevent your airblown inflatable unit from inflating at all.
  7. Insert the ground stakes through the legs into the ground, again being certain not to pinch any of the fabric of your airblown inflatable between stakes or between the stake and the ground.
  8. Plug your blower fan into your receptacle or extension cord (and switch on the fan if so equipped) to start inflating your airblown inflatable.   If your blower fan has different speed settings, be certain to set it on the lowest speed to ensure that your airblown inflatable inflates properly and that there are no kinks or any other issues with initial inflation.  If your blower fan does not start, check to see if it is equipped with a timer mechanism and adjust as necessary.  Also check to see that the outlet you are using supplies the required amperage to operate your airblown inflatable motor.
  9. Clip the tethers to each of the nylon loops on the side of the Airblown® Inflatable once your airblown inflatable is fully inflated. Insert the stakes into the ground maintaining approximately a 45° angle between the top of the tether on your airblown inflatable and the ground and attach the tethers, being certain that all tethers on your airblown inflatable are taut once completely inflated.
  10. Complete your final walk-around inspection of your airblown inflatable to ensure proper and safe installation.  Be certain that all of your anchor points are secure and there are no sharp edges, branches, bushes etc. contacting your airblown inflatable, the blower motor, the tether cords or the electrical cords and/or extensions.  Check one more time to be certain that your airblown inflatable is not blocking walkways or pathways, impairing visual lines of sight (i.e. blocking motorists view) or impairing normal traffic flow (i.e. blocking a speed limit or stop sign).
  11. Enjoy your airblown inflatable!

Thursday, May 24, 2012

My Inflatable is Not Inflating, What do I do?


The Christmas Inflatable product should fully inflate, have motion, rotate, or snow properly under most conditions. If it is not, please check the following: 
1. It is on a level surface. 
2. The fans are level and the intake vent of the fan is not obstructed by fabric or grass. 
3. The output vent (exiting the inflation fan) is not obstructed by fabric or any other foreign object. 
4. The fan is plugged directly into a wall outlet OR a heavy duty outdoor extension cord 
5. All zippers are zipped. Each piece may have two or more zippers. Sometimes there are zippers that are hidden in the seams. If you have a globe, sometimes there are zipper on the characters inside of the globe. Please double check to make sure all are zipped. 
6. For items over 5ft, check the fuse. Use your fingernail or screwdriver to open the fuse compartment that is located on the plug. One is in use, the other is a spare. Flip the two. You may keep the bad fuse in hand to get another one at Radio Shack or for the future (if needed). After the fuse is in place and the cover to the fuse box on the plug is covered, plug it in and try it out.

Template by:

Free Blog Templates